
Introduction to pSConfig Templates
Introduction
As detailed in What is pSConfig?, pSConfig’s workflow centers around templates that describe a topology of tasks. The concepts behind these templates and the format in which they are expressed are the primary focus of this document.
The templates themselves are in JSON format. You have a number of options for constructing the JSON including:
Manually building the JSON in a text editor
Using pSConfig WebAdmin
Regardless of how you build your template, the ideas described in this document are useful in understanding how pSConfig works. This document further provides the necessary foundation you need if you are building your templates manually or trying to understand the JSON of an existing file. After reading this document, you should be able to construct and understand a pSConfig template file.
Basic Concepts
Before diving into the actual JSON format of a pSConfig template, it’s helpful to first take a look at the basic concepts. This section describes some of the ideas behind templates in abstract terms. By the end of this section you should have an understanding of a template’s fundamental structure and be ready to translate that into the JSON format described in the next section.
Addresses
The most basic unit of a template is an address. An address is a collection of properties that act as the unit of input to a task. Despite the name and the fact that pSConfig’s primary use case is in networking, an address is not necessarily connected to an interface or host. It is simply an object with properties. If it helps, think of each of the shapes in the diagram below as a pSConfig address:

An abstract representation of three addresses as colored shapes.
Each of the shapes has certain properties such as they are all round and each is a particular color. In pSConfig terms, these properties can be used when constructing a task. Now let’s take a closer look at how we bring these properties together in groups.
Groups
A group is a description of how to combine addresses when building the list of tasks. All groups have a type that provides the base for how addresses are combined. Most types also provide type-specific options to customize that combination such as excluding specific pairs, directionality etc. Currently, pSConfig support three group types.
The first group type is mesh. A group of type mesh pairs every address with every other address in the group. Using the shapes from our addresses example, if we add them all to a group of type mesh, we will get the pairs shown on the right of the diagram below:
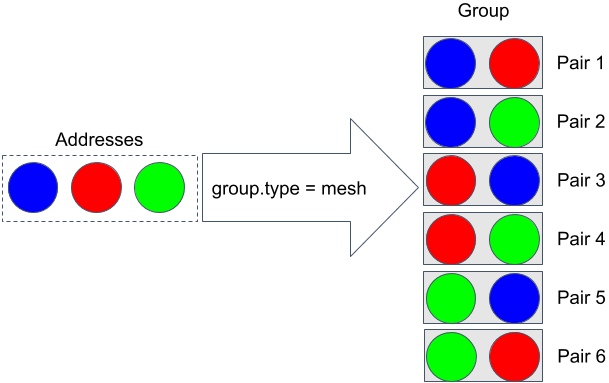
An abstract example of how addresses are combined in a group of type mesh.
The second group type is disjoint. A group of type disjoint pairs every address in one group (Group A) with every address in another group (Group B). Both groups can have one or more addresses. Using the shapes from our addresses example, if we add them all to a disjoint group we will get the pairs shown on the right of the diagram below:

An abstract example of how addresses are combined in a group of type disjoint.
The final group type is list. A group of type list returns each address independently. It is the only current type that does not pair addresses. Instead, it just generates a one-dimensional list of addresses (hence the name). Using the shapes from our addresses example, if we add them all to a list group we will get the items shown on the right of the diagram below:
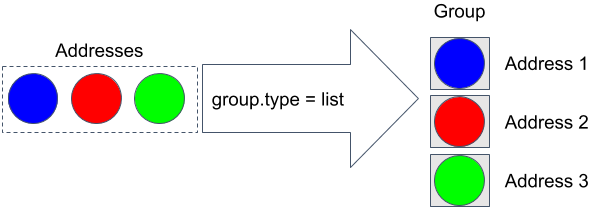
An abstract example of how addresses are combined in a group of type list.
No matter which group type is used, we now have the basis for generating our task list. Let’s now explore how we can pull properties out of the generated pairs and construct a task
Tasks
As defined in What is pSConfig?, a task is a job to do and consists of multiple components including:
An input set of addresses as determined by the group (see previous section)
A test that contains the set of parameters required to perform the job of the task
An optional schedule that defines when the task should run
Zero or more archives that describe how to store the task results each time it runs
Template variables allow pSConfig to access properties of the task components listed above to connect the various pieces of the task together. A visual representation of a task definiton is shown in the following diagram:
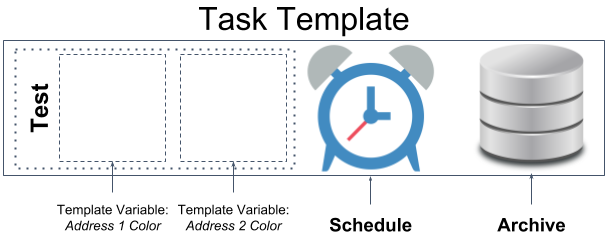
An abstract example of a task with a test using two template variables, an archive, and a schedule
In the above example, there is a test defined that extracts the color of the first address object using a template variable and does the same for a second input address.
Note
The above definition is assuming this task is associated with a group that generates a pair of addresses. If it were used with a group of type list you would get an error since that group type only provides one address.
It also has a fixed schedule and archive definition. We could also use template variables in the definition of these components, but for the sake of this example that is not shown.
Now that we have our task defined let’s put together our group and our task to see the final result in the next section.
Putting it all together
The diagram below shows the output when we associate our group of type mesh with the task definition from the previous section:
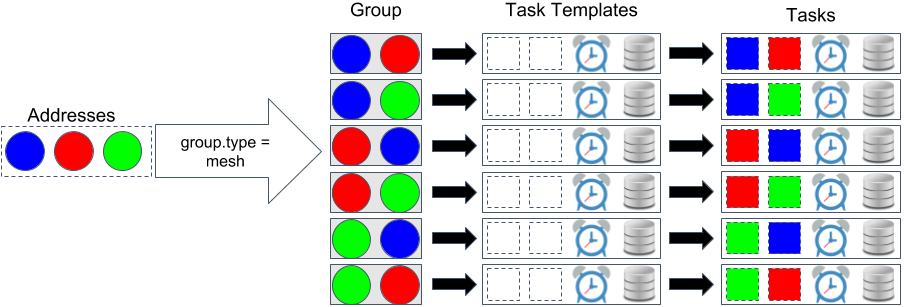
The combination a group of type mesh and task definition yields a task for each address pair that contains the colors of both addresses in the the test portion of the task
As shown in the diagram, for each pair in the group, we generate a task to be run using properties of the input addresses. Notice that the color of each address in the generated pair is used in the test component.
This concludes our abstract look at pSConfig templates, now let’s take a look at how we build actual templates using JSON.
JSON Basics
pSConfig templates are formatted as JSON. The abstract concepts outlined in the previous section are all represented in the JSON. We will continue with our abstract examples from the previous section to highlight the basic structure of the JSON.
Note
If you are more interested in an example closer to real-world applications, you may want to skip to the section Real-World Example.
Note
pSConfig template syntax is defined by our JSON Schema document. It is almost impossible to list all the properties and combinations of things that can be expressed in a template within the confines of this documentation page, so for any questions the absolute source of truth is the JSON schema file.
addresses
pSConfig templates represent the concept of addresses as JSON objects. Each address object has a single required address property as shown below:
{
    "address": "circle1.perfsonar.net"
}
In that example the address property is set to circle1.perfsonar.net. The address property MUST be in the format of an IP address or hostname. This is done primarily for the benefit of agents trying to determine the addresses for which they are responsible (for example, see Running the pSConfig pScheduler Agent). Keep in mind, there is no strict requirement the address property be used in the generated task at all, so think of it more an an identifier that happens to look like an IP or hostname.
The true power of addresses is revealed through the use of the _meta property. The _meta property is an optional arbitrary JSON object that can contain custom properties. Continuing with the circle example we can describe the shape and color in JSON as follows:
{
    "address": "circle1.perfsonar.net",
    "_meta": {
        "shape": "circle",
        "color": "blue"
    }
}
Note that almost all objects in pSConfig have a _meta property that can be used to describe custom parameters, not just address object. It is useful not only for building tasks, but also providing additional information to agents reading the templates, such as names to display for a particular object.
Address objects live in the addresses section at the top-level of a pSConfig template. Each address object has a name that is used to references this object in other sections of the template. This name is just a string and can contain letters, numbers, colons (:), periods (.), underscores (_) or hyphens(-). In the example below, we take our current object and add it to the addresses section with the name circle1:
"addresses": {
    "circle1": {
        "address": "circle1.perfsonar.net",
        "_meta": {
            "shape": "circle",
            "color": "blue"
        }
}
Finally to round out the example, we can add the JSON representation of the other two circles from our earlier example, noting that the color property changes in each _meta object:
"addresses": {
    "circle1": {
        "address": "circle1.perfsonar.net",
        "_meta": {
            "shape": "circle",
            "color": "blue"
        }
    },
    "circle2": {
        "address": "circle2.perfsonar.net",
        "_meta": {
            "shape": "circle",
            "color": "red"
        }
    },
    "circle3": {
        "address": "circle3.perfsonar.net",
        "_meta": {
            "shape": "circle",
            "color": "green"
        }
    }
}
groups
pSConfig templates represent the concept of groups as JSON objects. A group object has a required type property that indicates whether is is of type mesh, disjoint or list. Based on the type, there are additional required properties used to indicate which addresses belong in the group.
Groups of type mesh have one required property: addresses. An example is below:
{
    "type": "mesh",
    "addresses": [
         {"name": "circle1"},
         {"name": "circle2"},
         {"name": "circle3"}
     ]
}
The addresses property is an array of address selector objects. These selectors describe which address objects to use from the addresses section of the template. The most common way to select is by name, as is done in the example above. This group will combine all of the addresses selected into pairs with all the other selected addresses.
Note
Other types of address selectors are outside of the scope of this document but are detailed in Labeling Address Properties.
Groups of type disjoint have two required properties: a-addresses and b-addresses. An example is below:
{
    "type": "disjoint",
    "a-addresses": [
         {"name": "circle1"}
     ],
     "b-addresses": [
         {"name": "circle2"},
         {"name": "circle3"}
     ]
}
Again, each is a list of address selector objects and this example selects by name. Just as in the abstract example of disjoint, the resulting group will combine circle1 in a-addresses into pairs with the two circles in b-addresses.
Finally, we could also define a group of type list, and it only requires an addresses property be set which is (not-surprisingly) a list of address selectors:
{
    "type": "list",
    "addresses": [
         {"name": "circle1"},
         {"name": "circle2"},
         {"name": "circle3"}
     ]
}
The above example would generate a one-dimensional list containing each selected address object.
All of the group objects live in the groups section of a template. Each object is given a name just like in the addresses section. The name is used to references this object in other sections of the template and is a string that can contain letters, numbers, colons (:), periods (.), underscores (_) or hyphens(-). For our example, we are only going to use the mesh group, so it looks as follows with one group named colors_mesh:
"groups": {
    "colors_mesh": {
        "type": "mesh",
        "addresses": [
             {"name": "circle1"},
             {"name": "circle2"},
             {"name": "circle3"}
         ]
    }
}
tests
Test objects define the parameters of the job to be carried out by the task. A test object has a required type and spec property. The values of these properties, however, are completely opaque to pSConfig. Instead it relies on pScheduler to interpret the values. This is advantageous because as new plug-ins are installed into pScheduler, no corresponding changes are needed to the pSConfig source code. This means there are no pScheduler plug-ins out of reach for pSConfig.
Below is an example of a fictional colors test that assumes pScheduler supports a plug-in called colors:
"tests": {
    "colors_test": {
        "type": "colors",
        "spec": {
            "color1": "{% jq addresses[0]._meta.color %}",
            "color2": "{% jq addresses[1]._meta.color %}"
        }
    }
}
We’ll notice this fictitious plug-in supports a spec with two parameters called color1 and color2. Those strange looking strings in the value are template variables, which we’ll take a closer look at in the next section.
Note
For more information on valid pScheduler test specs, see Test and Tool Reference, the documentation of the test plug-in you are using or the documentation of the tool you are using to generate the JSON.
Template Variables
Template variables are how we access properties of task components to connect them to other components. They can be included in strings of certain JSON objects and take the form of:
{% VARIABLE %}
In our tests example we saw use of the jq template variable. This variable uses the jq processor to select portions of the JSON. The first variable looks like the following:
{% jq addresses[0]._meta.color %}
Let’s break this variable down:
The
jqportion is simply the name of the variable.The
addresses[0]portion selects the first address in the pair generated by the group (as indicated by index 0 in between the square brackets)the
._metaportion selects the_metaobject of that addressThe
.colorportion selects the color property
Likewise, the second variable looks as follows:
{% jq addresses[1]._meta.color %}
It is the same as the first except for the address[1] portion that indicates to use the second address (as indicated by index 1 in between the square brackets) from the input pair. As a result, color1 receives the value of the color property from the first address in the pair and color2 receives the color of the second.
There are many other template variables and listing them all is beyond the scope of this document. For more information on other template variables please see pSConfig Template Variables.
archives
Archive objects are optional components of the template that tell agents where the results of the described tasks are to be stored. Archive objects at a minimum have an archiver field that indicates the type of archive and a data field containing archive-specific parameters. Archive objects in pSConfig are taken directly from pScheduler. The only pSConfig-specific field in this object is the optional _meta tag that can be used for custom properties. Beyond that, pSConfig has no idea how to interpret the fields within an archive object. This is intentional as it does not require any changes to pSConfig when new archiver plug-ins are installed in pScheduler.
Note
For valid specifications of these objects it is recommended you see the pScheduler archiver reference, the documentation for a specific plug-in or the documentation for the tool you are using to generate the JSON.
Below is an example of an archivers section we define that uses an esmond archiver:
"archives": {
     "colors_archive": {
          "archiver": "esmond",
          "data": {
              "url": "https://{% scheduled_by_address %}/esmond/perfsonar/archive/",
              "measurement-agent": "{% scheduled_by_address %}"
          }
     }
 }
As we’ve seen in the other template sections, it is given a name colors_archive that can be referenced in other areas of this document. This definition also uses the template variable {% scheduled_by_address %} in two places. This variable is replaced with address property associated with the address object representing the agent that will schedule the task. More information on this property can be found in pSConfig Template Variables. For the sake of this example, what’s perhaps more important than the variable meaning is how it’s used. Notice that in the url property we have embedded the variable within text. pSConfig is able to expand this while leaving the surrounding text intact so we can dynamically build things like URLs. No matter how deep you embed a variable in an object, pSConfig will be able to expand it.
schedules
Schedule objects are optional components of the template that tell agents how often to run a task. They are optional because you don’t need them for tasks that run continuously, but for periodic tasks they are needed if you want the task to run more than once. Schedule objects are borrowed directly from pScheduler. See the schema file for a full list of properties, but some of the more common ones are shown below:
"schedules": {
    "colors_schedule": {
        "repeat": "PT1H",
        "slip": "PT1H",
        "sliprand": true
    }
}
We define one schedule named colors_schedule which will tell a task using it to run on a random interval between every 1-2 hours. The repeat property is an ISO8601 duration telling a task that uses it to repeat at least every hour. The slip says that it can run up to 1 hour later than that (i.e. 2 hours). Finally, sliprand tells it to randomly choose an interval between those two values for each run. This is commonly done to prevent tests from bunching together at the beginning of a time interval. As stated earlier, you may use more or less options according to the schema, but the combination of these three is a common case.
tasks
After building all of the components, we are finally ready to build our task. This is actually just a matter of referencing the names of the components we built above. Below is an example using the group, test, archive and schedule objects we defined, respectively:
"tasks": {
    "colors_task": {
        "group": "colors_group",
        "test": "colors_test",
        "schedule": "colors_schedule",
        "archives": [
             "colors_archive"
         ]
    }
}
Note that when building a task the only strictly required fields are group and test. Others like schedule and archives are not strictly required, but are commonly used since one generally needs to run a test more than once and store the results. There are additional fields that control the tool used, set the task priority and more but they are beyond the scope of this document.
Real-World Example
With the basic concepts behind us, we will now move away from the abstract and into an example with foundations closer to reality. The basic setup of the example is described by the diagram below:
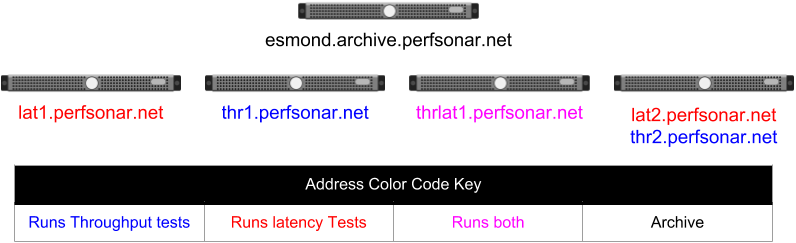
Example set of hosts we want to run tests between each other and publish to a central archive
In the diagram, hosts are represented by the images of blade servers. We have four hosts that we want to run latency and/or throughput tasks and a fifth host that does not schedule any tasks but instead stores the results of the others in a central archive. Under each server image is one or more hostnames of network interfaces attached to that host. The diagram color-codes the interface hostnames, but working counter-clockwise around the diagram each host has interfaces with the following role:
The host at the top with the esmond.archive.perfsonar.net interface will not perform any tests and will be running an esmond archive.
The host with a single interface addressed lat1.perfsonar.net will only run latency tests.
The host with a single interface addressed thr1.perfsonar.net will only run throughput tests.
The host with a single interface addressed thrlat1.perfsonar.net will run both latency and throughput tests on the same interface.
The host furthest to the right has two interfaces. The interface addressed lat2.perfsonar.net will run latency tests and the interface addressed thr2.perfsonar.net will run throughput tests.
For our example, we want every latency interface to test to every other interface capable of running latency tests. Likewise we want every interface capable to running a throughput test to run to all the others that support throughput tests. Given this desired task topology, let’s walkthrough how we construct the JSON of a pSConfig template.
Note
The approach shown in this section is not the only way to express a template for the task topology described, it is simply one way. pSConfig is highly flexible and expressive so there is no one correct answer when building a template as long as the resulting task topology meets your goals.
addresses
First we need to build our addresses section. Our address objects will correspond to the interfaces of the hosts in our diagram as shown below:
"addresses": {
    "lat1": {
        "address": "lat1.perfsonar.net"
    },
    "thr1": {
        "address": "thr1.perfsonar.net"
    },
   "thrlat1": {
        "address": "thrlat1.perfsonar.net"
    },
    "lat2": {
        "address": "lat2.perfsonar.net"
    },
    "thr2": {
        "address": "thr2.perfsonar.net"
    }
}
Notice that each has a name by which to reference it within the template and the required address property. It does not have any further fields such as _meta because we do not need them for the tests we are trying to build. Often these are the only fields you need, so it is not necessary to set any further information.
Note
The addresses labelled lat2 and thr2 are separate address objects even though they are on the same physical host. From the perspective of the tasks we want to create, it doesn’t really matter that they are on the same host. If it did matter, pSConfig does provide a host object that groups addresses. For the sake of keeping things concise though, we did not use it in this example since it is extraneous information for our desired task topology.
groups
We combine the addresses into two groups of type mesh: one for latency tests and one for throughput tests:
"groups": {
       "latency_group": {
           "type": "mesh",
           "addresses": [
                {"name": "lat1"},
                {"name": "thrlat1"},
                {"name": "lat2"}
            ]
       },
       "throughput_group": {
           "type": "mesh",
           "addresses": [
                {"name": "thr1"},
                {"name": "thrlat1"},
                {"name": "thr2"}
            ]
       }
   }
Each group selects only those address objects that are marked in our diagram for latency tests and throughput tests, respectively. The only common member of each is the address with name thrlat1 since it runs both types of tests. Since we are using the type mesh, every member address will run a test to every other member within the group. This matches our stated task topology.
tests
We can now define the parameters of the two types of tests we want run in the tests section:
"tests": {
    "latency_test": {
        "type": "latencybg",
        "spec": {
            "source": "{% address[0] %}",
            "dest": "{% address[1] %}",
            "packet-interval": 0.1,
            "packet-count": 600
        }
    },
    "throughput_test": {
        "type": "throughput",
        "spec": {
            "source": "{% address[0] %}",
            "dest": "{% address[1] %}",
            "duration": "PT30S"
        }
    }
}
Our first test, named latency_test, defines a test of type latencybg. The type must always correspond to a pScheduler plug-in since pSConfig has no knowledge of how to interpret tests. The latencybg type creates a test that continuously runs latency measurements. We have given it the following parameters in the spec:
sourceis a hostname or IP indicating the sender of data in the test. We set it to the special template variable{% address[0] %}. This variable means take theaddressproperty of the first address object in the pair generated by the parent task’s group. Since theaddressproperty must be a hostname or IP by definition, using this template variable also meets the requirements ofsource.destis a hostname or IP indicating the receiver of data in the test. We set it to the special template variable{% address[1] %}. This variable means take theaddressproperty of the second address object in the pair generated by the parent task’s group. Since theaddressproperty must be a hostname or IP by definition, using this template variable also meets the requirements ofdest.The
packet-intervalis the time in seconds in between sending individual packets. A value of0.1indicates to send 10 packets per second.The
packet-countis the number of packets to send before reporting a result. A value of600indicates to send 600 packets before generating a summary and reporting a result. Combined with ourpacket-intervaland the fact that this type of test runs continuously, there will be a result reported every 60 seconds.
The second test, named throughput_test, defines a test of type throughput. This creates a test that periodically runs a measurement of network throughput. Our spec defines the following:
sourceis a hostname or IP indicating the sender of data in the test. Just as in ourlatencybgtest we set the value to the template variable{% address[0] %}.destis a hostname or IP indicating the receiver of data in the test. Again, just as in ourlatencybgtest we set the value to the template variable{% address[1] %}.durationindicates the length of time to run the test as an ISO8601 duration. In our example the test will run for 30 seconds.
archives
We have a single host dedicated to archiving the results from all the others. It is defined in the following archives section:
"archives": {
   "esmond_archive": {
        "archiver": "esmond",
        "data": {
            "url": "https://esmond.archive.perfsonar.net/esmond/perfsonar/archive",
            "measurement-agent": "{% scheduled_by_address %}"
        }
    }
}
As stated before, it is running esmond, so we use the archiver of type esmond. For the data section we have two fields:
The
urlis a fixed URL pointing at esmond.archive.perfsonar.net as listed in our diagram. Since all the measurements will get registered to the same place, no template variables are needed for theurl.The
measurement-agentis a field esmond uses to keep track of the host that requested the original measurement. Here we can use the{% scheduled_by_address %}template variable to have the agent automatically fill-in the value since it will depend on where the agent is running that creates the task.
schedules
Our throughput test will need a schedule so we create one below that will randomly run the test every 4-8 hours:
"schedules": {
   "every_4_hours": {
        "repeat": "PT4H",
        "slip": "PT4H",
        "sliprand": true
    }
}
Note
latencybg tests run continuously, so they do not need an explicit schedule.
tasks
Now that all our components have been created, we can finally create our task definitions:
"tasks": {
    "latency_task": {
        "group": "latency_group",
        "test": "latency_test",
        "archives": ["esmond_archive"]
    },
    "throughput_task": {
        "group": "throughput_group",
        "test": "throughput_test",
        "archives": ["esmond_archive"],
        "schedule": "every_4_hours"
    }
}
As expected there are two tasks: one for latency measurements and another for throughput measurements. Notice that latency_task does not reference a schedule whereas throughput_task does. This is because latency_task runs continuously whereas throughput_task is on a periodic schedule. Beyond that, the task references the other components by name. With this final piece in place, we now have a complete template that describes our originally stated task topology.
Putting it all together
You can download a full example of the JSON file described in this section here.
For more example templates see the directory /usr/share/doc/perfsonar/psconfig on any host with a pSConfig package installed. In particular see /usr/share/doc/perfsonar/psconfig/skeleton.json for a good starting point of building your own template.